
 Canadian Dollar (CAD)
 Euro (EUR)
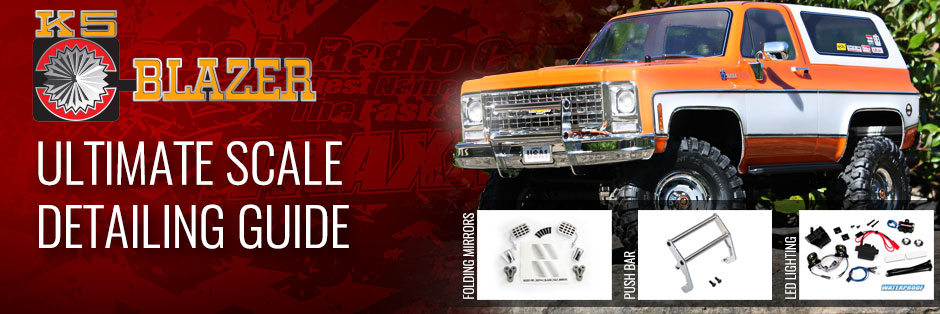
Get Maximum Scale Realism in a Few Short Steps

We’ll begin with the 8133X folding rear-view mirrors. The kit includes left and right mirrors, and they fold just like the full-size versions.


The stock Blazer mirrors are held by o-rings and body clips—just pull the clips and pop the mirrors out of the body. Apply the “reflection” decals to the mirrors before installation. Note that the mirror shape has a slightly flatter curve on the “arm” side, and the decals are shaped to match. The top decal is for the left mirror, and the bottom is for the right.
 Remove the old clips and mirrors
 Apply the mirror decals
The mirrors mount to the body via three holes, two of which are already in place from the stock mirrors. The instructions include a template for placing the third mounting hole. Line up the template over the existing holes and tape it to the body, then ream the third hole. The Traxxas 3433 body reamer is the ideal tool for the job. If you want the deluxe model, 3433X is the aluminum-handle version.
 Cut out the template for the holes
 Line up the template
 Use a reamer to make new holes
Insert the mirror into its base, and secure it to the body using the retainer and supplied 2.5x8 mm screws. Repeat the process for the other side.
 Insert the mirror
 Tighten the screws
 Repeat for the other side
Installing the Push Bar
Next, we can move on to the 8138 push bar, which mounts to the bumper. Just hook the top of the push bar over the top of the bumper, and swing it down into position. Flip the chassis over, and install the supplied 3x10 mm screws through the push bar into the bumper mount.
 8138 push bar
 Swing the push bar into position
 Secure the push bar
Installing the Lights
We’ll install headlights, marker lights and tail lights in the body using the 8038 Blazer Light Kit with included LED Lighting Module, plus eight rock lights in the chassis’ fender wells with the 8026X kit. Before installing the LEDs in the body, the Lighting Module is installed on the chassis. Attach the module to the bosses in the chassis, plug it into the speed control, and route the module’s receiver plug under the battery tray and into the receiver box.
 Blazer LED light kit
 Rock light kit
 Install the lighting module
To install the headlight LEDs, first remove the headlight lens assembly. The backing plate will be reused. Each headlight is fitted with a reflector. The reflectors index to the headlight boards via pins that fit into holes alongside the square LED chip, and the back of reflector is raised on one side for clearance over the circuit components.
 Remove the headlight lens assembly
 LED headlight reflector
Sandwich the LED circuit board between the lens and the backing plate. The lens has pegs that align with the plate.
 Install the LED circuit board
 Align the pins
The LED headlight assemblies install the same way the unlit parts came out. Just slip them into the body and install a 2.5x6 mm screw to secure each headlight. The side marker and tail light LEDs simply plug into the existing housings, no tools or disassembly required.


The LED wires plug into the distribution block, which mounts to a bracket installed behind the driver’s-side door handle. The block and wires are color-coded, just plug the wires into the openings as labeled. The bracket captures the wires so they can’t be pulled out, so you’ll need to plug the wires into the block before mounting the block to the bracket. Use the supplied zip-ties and tie-off points to secure the wires. Leave some slack so body flex won’t pull on the connections. Installation is now complete—just insert the plug into the LED Lighting Module on the chassis, and the LEDs will come on when the truck is powered up.
 Plug lights into the distribution block
 Secure lights to the body
Now we’ll install the rock lights, which is a quick and easy job. Begin by removing the covers from the rock-light positions in the fenders. Next, simply replace the covers with the Rock Lights. The LED units are daisy-chained together. Just start at the position closest to the speed control, and proceed around the chassis. Use the included zip-ties to tie off the wires, leaving some slack to accommodate chassis flex.
 Remove all the rock light covers
 Install the rock lights
Plug the rock lights into the LED Lightning Module, and the job is done. You can bundle the excess wire, or wrap it around a screwdriver shaft to coil it as shown. The rock lights will come on when you power up the truck. Note how the rock lights completely light up the area under the truck. Those LEDs are bright!
 Plug the rock lights into the lighting module
 All lights illuminated
Now that’s a sharp Chevy! We added a few logos from the 2514 Racing Sponsors decal sheet as the finishing touch. Now our Blazer is even more realistic and ready for whatever’s around the next corner—day or night.


Traxxas offers exciting LED lighting kits, detail parts, and performance upgrades for all TRX-4 models. Click the links below to view more accessory options.