
 Canadian Dollar (CAD)
 Euro (EUR)
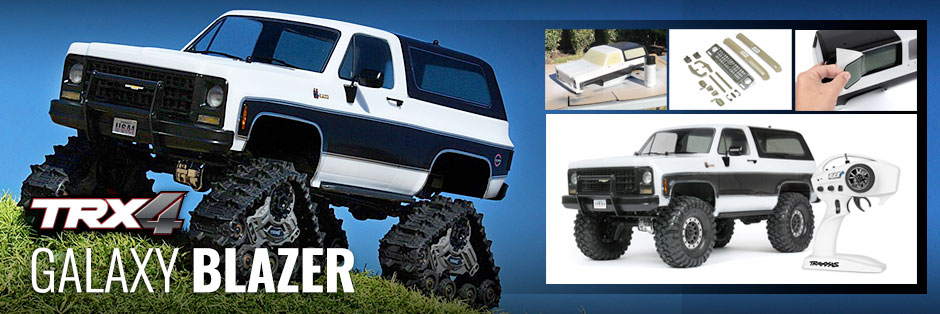
Add a Menacing New Look to your TRX-4 Blazer

| | |
| Galaxy Blazer Parts List | |
| | |
| | |
| | |
Add all accessories for this build to your cart with one click!
Step 1: Chrome Removal
While it is possible to paint over chrome, we’re going to strip the plated finish off for best paint adhesion. To do this, simply soak the chrome parts in Super Clean degreaser. This water-based cleaner does a great job of stripping the chrome, and won’t damage the plastic.

Soak the parts in Super Clean for an hour. Use a toothbrush on stubborn chrome if necessary.

Our Blazer body detail parts are stripped and ready for paint.
Step 2: Paint the Parts
Safety first: only use spray paint outdoors, and wear a respirator or mask. We finished the parts in semi-gloss Rust-Oleum 2X Ultra Cover, which bonds well to plastic. Shake the paint well, and be sure to watch where any overspray is going—you don’t want to mist the garage door or family car, for example.
The tail light lenses aren’t removable, so we masked them off. We also taped over the openings for LEDs to make sure no paint entered the housings. Poster putty or modeling clay can be used to hold small parts off your painting surface for full coverage, and to prevent the force of the spray from moving them. Or, if you’re feeling ambitious, you can use a block of wood, stiff wire, and alligator clips to make a small-parts painting jig.

Mask the lenses and the LED openings.

Use clay to hold the parts down while you spray them.

A painting jig is a great option!
We used Rust-Oleum 2X Ultra Cover to paint the parts. Shake the can well and get a feel for the paint flow with a few practice sprays before you hit the parts. Two or three light coats will assure full coverage and preserve detail better than one heavy coat.
 Make a few practice passes with the paint.
 Finished painted parts, ready for installation.
Step 3: Body Prep
Wash the body with dish soap and warm water to remove any residue from the molding process or skin oils from handling that might interfere with the paint. Dry thoroughly, then apply the included window and cap masks to the inside of the body. Use a credit card or your thumbnail to make sure the edges of the masks are fully stuck to the body. Check by inspecting the adhesive side through the clear plastic—you’ll be able to see any areas that need more pressure.
 Plain dish soap is all you need for body prep.
 Apply the window masks first.
 The masking for the cap goes over the window masks.
 Masks are numbered in application sequence.
The decal sheet also includes masks for the Blazer’s traditional contrasting-panel look.

Save the window mask outlines and the slick backing from the masking sheets (you’ll see why soon).
Step 4: Paint the Main Color
Be sure to choose a polycarbonate-compatible spray paint for clear RC-car bodies. Ordinary paints may appear to work OK, but will easily crack, flake, and peel when the body is in use. When painting a clear body, it’s best to paint the darkest color(s) first. If you paint a light color first and apply a dark color over it, the dark color may show through the lighter color. If you must put down the lighter color first (as we are), you can prevent show-through by applying an extra coat or two of color and backing it with silver.

Only white and black will show from the outside, but we’re also using silver as a protective backing color for the white areas.
 We applied three coats of white for maximum opacity.
 We backed the white coats with silver.
Step 5: Paint the Cap
Now we can peel off the cap and side-panel masks and spray the areas black. Before spraying, re-check the window masks to be sure the cap mask didn’t lift any of their edges. Once the black paint is down, all the masking can be removed. You can also peel off the overspray film, that’s always a treat.
 Painting the cap black
 Paint applied, masks removed, film peeled.
Step 6: Apply the Decals
The decals are die-cut so they can be peeled directly off the backing sheet without cutting, but larger decals and the thick trim strips can tricky to apply if peeled off completely. For easy, precise placement, leave the decals on the backing sheet and cut them out with scissors. You don’t have to cut right up to the edge of the decal, just get close. Peel away a half-inch or so of backing and trim it off. Now you can handle the decal by the part that’s still backed as you position it just right. Once you’ve got the decal lined up, stick down the peeled section. Burnish the rest of the decal down as you peel more backing off.

The decals are die-cut, but the larger decals can tricky to apply once fully peeled. Here’s the trick:

Cut the decal out with the backing still on. Peel off a small section to make positioning the decal easier.

Once you’ve got the decal properly lined up, peel away the rest of the backing.
Step 7: Install the Bumpers and Detail Parts
If you’re not sure which screws and clips go where, just consult the exploded view for the Blazer body.

Finishing Touch: Method 105 Beadlock Wheels
For all-around wheeling, we chose Method 105 beadlocks and outfitted them with satin rings for contrast. Most full-size beadlock wheels don’t have contrasting rings on the chassis-side of the wheels, so we installed black inner rings for a more realistic look.
 We installed satin rings on the front side of the wheels...
 ...and black rings on the back.
Optional: The Flat Look
After a photo shoot with the Blazer showing off a glossy look, we went back and gave it a matte finish. It’s a simple matter of hitting the outside of the body with a coat of matte clear paint. But we don’t want a flat finish on the windows, they need to stay shiny. To easily create perfectly sized window masks, we applied painter’s tape to the slick backing sheets from the original masks. Then we applied the window shapes leftover from the masking sheet onto the tape. These served as cutting guides to trim out the masks with scissors.

We stuck the waste from the window-mask sheet onto painter’s tape as a trimming guide to create new masks for the outside of the body.

Window masks in place, ready for a coat of flat clear. You can leave the details parts on or take them off.

Flat coat applied—you can really see the difference in the roof.
The Final Upgrade: Traxx
For superior traction in soft stuff like sand, snow, and mud, we’ve got Deep-Terrain Traxx ready. In addition to their massive surface area, the tracks lower the effective gear ratio so the truck rolls approximately half as far with each motor revolution to deliver even greater torque.

 We went a little crazy and gave the transmitter a new look too.
 We’re digging the interstellar vibe of this Blazer build, and we hope it’s inspired you to try a new look for favorite Traxxas machine. To see all the body, wheel, tire, and accessory options for your model, just visit its page here and click the Accessories tab. Find your favorites, add them to your cart, or head for the hobby store. When you’re ready to show off your ride, remember to tag Traxxas so we can see your creativity at work.


