
 Canadian Dollar (CAD)
 Euro (EUR)
Ready for the Trail!
View the Full Line of TRX-4 Accessories

Line up the screw-pins on the shaft halves to ensure vibration-free operation and maximum shaft life
Time to admire this beast. The modded chassis doesn’t look very different in a top view, all the cool stuff is underneath. A 3-cell, 5000 mAh Power Cell iD LiPo provides the power.

 Completed front axles
 Completed rear axles
Now we’re talkin.’ The blue-anodized parts really pop against the black chassis.
 Front hub detail
 Rear hub detail
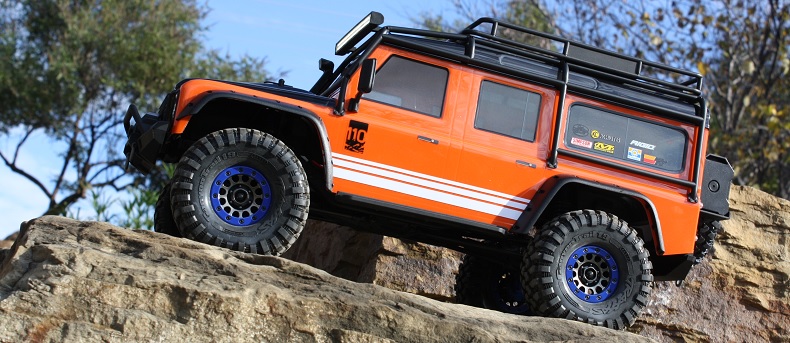
Lovin’ it. The matching beadlock rings look fantastic, and the blue sets off the black hardware nicely. This rig looks like it’s ready for the SEMA show. The Adventure body was a great choice, and a low angle lets us get a peek at the anodized parts. That orange and blue contrast really pops. The LED lights are seriously bright. They really put out some lumens—both ahead of the truck and underneath it, thanks to the LEDs tucked into the wheel wells.


Now that’s a good-lookin’ TRX-4. the RIGID decals come with the LED light set, the other brand logos on the rear windows are from the 2514 “racing sponsors” decal sheet, and we covered how to make the stripe graphics in Part 1.


Driving the Ultimate TRX-4 Trail Truck
While it’s plenty of fun just to admire the UTT build as a great looking model, the real fun of RC is being able to drive the thing, and this truck was not built to be a shelf queen. Despite the suspension settings and weight distribution being unchanged from the stock truck, the UTT Defender has noticeably improved traction thanks to the extra weight of the aluminum parts on the axles putting gravity to work. And that extra weight is down low, which lowers the center of gravity—bonus.
Suffice it to say, the UTT really grabs. Steering feel is quicker when romping around in high gear because of the High Torque servo’s faster transit time compared to stock, but the real performance boost is when you need maximum steering muscle to leverage the truck off of obstacles—especially when there’s lots of grip to work against. With 400 ounce-inches pulling on the linkages, the super-servo has no trouble pushing and shoving the Canyon Trail rubber wherever it needs to go. The TRX-4 Defender is the most trail-ready RTR straight out of the box, but it’s even better with upgrade gear—and installing it all is part of the fun. Nothing fits and works better than genuine Traxxas parts and accessories, and the attention Traxxas gives to making everything easy to install guarantees a good time at the workbench.


See Part 1: custom Defender body, beadlock 1.9″ tires and wheels, and LED lighting.
See Part 2: machined diff gears, blue-anodized aluminum accessories, and more.
See Part 3: blue-anodized aluminum GTS shocks, High Torque 400 servo, and High-Output BEC.
If you enjoyed wrenching on your TRX-4, we've got another project just for you! Head on over to our Maximum Mud Bronco build where we add some serious brushless horsepower to the TRX-4.
Get your wrench on, and show us how your Trail Truck build turned out! Post your pics to Facebook, Instagram or Twitter with #MyTRX4Build, and we’ll be sure to share some of our favorites.