
 Canadian Dollar (CAD)
 Euro (EUR)
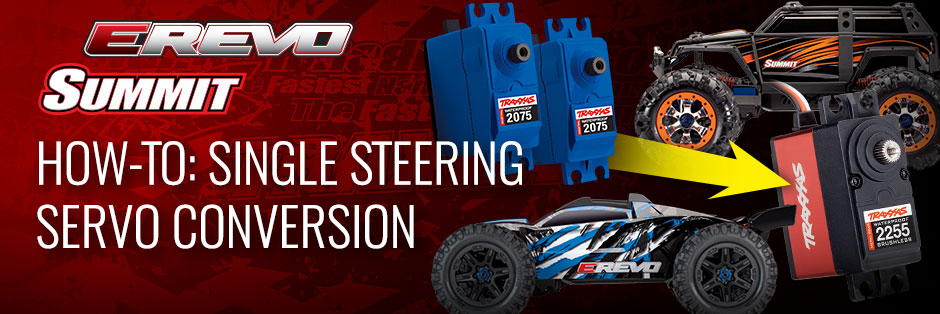
Get 60% More Steering Power with the High-Torque 400 Brushless Servo

For this how-to, we’re installing a 2255 High-Torque Brushless servo in an E-Revo VXL and filling the open servo position with a 5326X cover plate. You can follow the same steps for the Summit and Revo 3.3.
| |
| Required Parts and Tools |
| |
| |
| |

The High-Torque 400 servo combines an all-metal gear train with a brushless motor to deliver super-responsive steering with 400 oz.-in. (25 pounds!) of torque.

One High-Torque 400 servo has as much power as three of the stock 2075 servos (or 3.2 servos, if you want to be totally precise).
Step 1: Remove the motor to access the receiver box
You can access the Revo 3.3’s receiver by simply removing the clip that secures the receiver box lid, but the E-Revo and Summit require a little disassembly. Both trucks mount their receivers in watertight enclosures, which are held closed by two screws. We can access the receiver by removing these screws, but to remove the wires from the receiver box, we need to first remove the motor so we can get to the receiver box’s wire clamp.

Remove the gear cover and motor screws.

A ball-end 3 mm driver makes the job easy.

Remove the screws from the receiver box.
Remove the gear cover screw and the two screws that secure the motor, then pull the motor back and swing it out of the way. TIP: use the L-shaped 3.0 mm wrench included with your model to more easily remove the lower button-head screw. Or, upgrade your tool kit with the 8716-30 3.0 mm ball-end Speed Bit and 8720 large Speed Bit handle for maximum wrenching efficiency and convenience. Once you have access to it, remove the screws that secure the receiver box lid and wire clamp to access the receiver.
Step 2: Unplug the steering servos

The steering servos are plugged into the Channel 1 (CH1) ports in the receiver. Pull the plugs straight up to remove them, then gently pull the servo wires and plugs out through the slot in the receiver box.
Step 3: Remove the 2075 servos

Remove the screws that secure the steering linkages to the servo arms, and the two screws that secure each servo guard.
 From the top of the truck, remove the four servo screws.
Lift the servo out of the chassis.
Step 4: Center the High-Torque 400 steering servo
A servo is “centered” when you’ve made certain the servo’s output shaft is at neutral (or “centered”). Centering the servo assures the wheels will be pointed straight ahead after installation. It’s always good practice to make sure your servo is centered before installation.

Feed the servo’s plug through the slot in the receiver box and plug it into either Channel 1 port. Be sure the wires are flat so the foam clamp forms a good seal.

For safety, unplug any of the motor’s wires. This will prevent the model from rolling off the bench if you touch the transmitter trigger in the next step.

Power on the transmitter and vehicle. Confirm the servo operates with the steering wheel, then set the steering trim knob to zero. Power everything off and then reconnect the motor wire.
Step 5: Close the receiver box and reinstall the motor.
Make sure the wire clamp’s foam seals are well greased before installing the clamp, and make certain the receiver box’s blue silicone gasket is properly seated in its channel before installing the lid.
Be sure to grease all the seals before you close up the receiver box.
Reinstall the motor and the screws you removed in step one.
Step 6: Install the new servo
You can install the new servo in either open location. For easiest wire routing and best weight distribution, we’re installing the servo on the right side of the chassis.
Install the servo as shown using the screws you removed in Step 3. Position the servo with the wire side facing the rear of the model.

Remove the servo arm from one of the 2075 servos and install it on the 2255 servo. Install the arm so it is off center by one position as shown.

Reattach the servo arm to the steering linkage, and reinstall the servo guard.
Step 7: Install a cover plate in the open servo location
The 5326X cover plate can be installed to fill the open servo location. It was originally designed for the Revo, and is a direct fit in the nitro truck—just install using the four screws supplied with the plate. For installation in the E-Revo and Summit, you’ll need to modify the part slightly.

Use flush cutters to remove the tabs as shown. This will allow the plate to fit the E-Revo and Summit chassis.

Use just two of the supplied screws to account for the different hole spacing between the plate and chassis.

Here’s the completed servo and cover plate installation from above and below the chassis.

We reinstalled the servo guard to protect the exposed bellcrank arm.
Step 8: Final trimming
Now you’re ready to power up. Switch the transmitter and truck on, and confirm the truck steers right when you turn the wheel right, and vice-versa. Make sure the wheels point straight ahead when the steering wheel is centered. If they’re slightly off center, adjust the center position using the transmitter’s steering trim knob. If the wheels are too far off center to be straightened using the steering trim knob, return the knob to the center position, and power the model off. Remove the servo arm and reinstall it so the steering system is as close to centered as possible. Power back up and use the trim knob to fine tune the steering for straight running at neutral.
That’s a Wrap!
Another job well done. Our E-Revo VXL is ready to shred with 60% more steering power and a durability boost thanks to the bulletproof metal gears inside the High Torque 400 Brushless servo. Did you notice some other upgrades? This is our Full Option Build E-Revo VXL, so it’s loaded—click the link below to check it out.