
 Canadian Dollar (CAD)
 Euro (EUR)
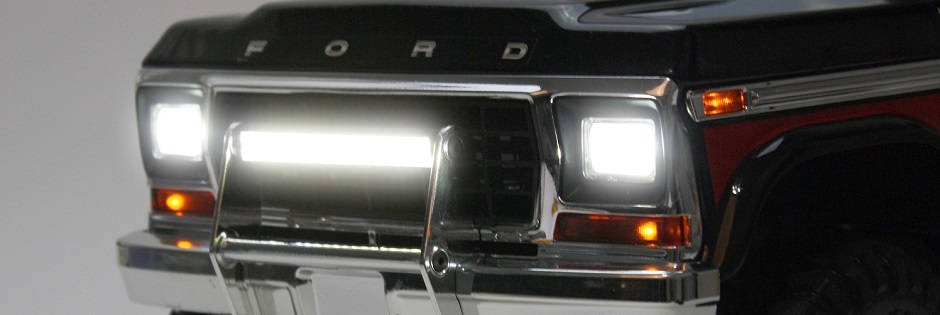
Amp up the Realism on your TRX-4 Bronco or Blazer

The 8088 light bar is designed to fit in the TRX-4 Sport’s bumper, but it can be easily modded to fit the accessory push bar for Bronco and Blazer.


Getting Started
| |
| Parts List |
| |
| |
| |
Step 1: Remove the top tube from the push bar by taking out the two screws that hold it in.

Step 2: Drill the mounting holes in the light bar, using the reinforcing rib as a guide to make sure the mounting holes are in the same spot on each side. A 3/32″ bit will make the holes the correct size for the mounting screws to self-thread. To prevent the bit from drilling too deeply, wrap tape around it as a depth gauge. The mounting holes only need to be 5 mm deep.
 Use the reinforcing rib as a guide for hole placement
 Use a 3/32″ drill bit with tape as a depth gauge
Step 3: Trim the mounting tabs off of the light bar. A flush cutter is the best tool for this job. Wear eye protection and use caution when trimming the tabs. The cut edges will be hidden once the light bar is installed, but you can sand the sides smooth if you like.
 Use side-cutters to trim the tabs
 Trim the tabs flush with the ends of the housing
Step 4: Install the light bar in place of the tube you removed in Step 1, using the tube’s hardware. Position the light bar so the wires will be on the left side of the chassis when the push bar is mounted. Tighten the screws enough so the light stays put, but can still be repositioned for aiming the beam when you’re out on the trail.
 The push-bar / light combo is ready to mount on the bumper
Step 5: Install the push bar on the bumper using the supplied instructions. Just hook the push bar over the bumper, then install the two supplied screws that go into the bosses under the bumper.
 Two screws are all it takes
 Now we just need to plug it in
Powering the Lighting Module
If your TRX-4 doesn’t already have a lighting kit installed, you’ll need the 8028 LED lighting module to power the 8088 light bar. The module is a waterproof, regulated power supply that delivers 3 volts at 0.5 amps to keep your LED lights glowing steadily and at full power no matter how hard the rest of your electronic gear is working. The lighting module is available separately, and as part of the complete LED lighting kits for the Bronco and Blazer.
Step 6: Route the wires along the chassis to the lighting module, making sure to dip the wire behind the bumper so the body doesn’t pull on the wires when installed. We routed the wires through the clip that holds the motor leads, then behind the speed control and under its mounting lug, and beneath the lighting module.
 Leave slack for the body to fit behind the bumper
 Route the wires to the lighting module
Step 7: Plug the light bar’s two-wire plug into the lighting module (you can use any pair of pins). When you power your truck on, the light bar will switch on in low-beam mode. To activate high-beam mode, plug in both the single-wire and two-wire leads.
 The two-wire plug powers the light
 Plug in the light bar
 3-in-1 wire harness
 Install a battery, power up, and admire your new light bar. Our Bronco also has the 8035 LED light set installed.
How About Two Light Bars?
We found ourselves wondering what a two-bar combo would look like, so we went for it. Replacing the push bar’s lower tube with a second light bar wasn't an option because it interfered with the bumper, so we drilled a new set of mounting holes in the side plates. To make sure the mounting holes for the second light bar were aligned, we screwed the side plates together and drilled both plates at the same time. Mounting the light bar to the flat area of the plate left a gap of about 1.5 mm. We installed two 3x7 mm washers (2756) on each side to take up the space, and used 3x6 mm screws (2575) to mount the light.
 Screw the plates together and drill one hole
 Use washers to fill in the gap
That marks the end of our build. We're ready to hit the trail and light up the night. One light bar is great, but the second light bar brightens up even the darkest paths.

