The store will not work correctly when cookies are disabled.
This website uses cookies to enhance your user experience.Your interactions and personal data may be collected on our website by us and our partners in accordance with ourPrivacy Policy.
Please create a new account
Use the same email as the previous website to link your account
Sign Up Here
Traxxas Support is open 7 days a week!
Dial 888-TRAXXAS or click Live Chat 8:30am-9:00pm CST.
Learn more.
FREE standard shipping on all orders over $99!
Discount automatically applied at checkout.
Learn more.
To properly use the 2 or 4-Amp DC Peak-Detecting charger that is included with your Traxxas vehicle, simply follow these steps.
Plug the charger into a 12-volt automotive auxiliary power socket
or the optional Traxxas AC to DC Power Supply Adapter (#2976). When
the charger is ready to begin charging the LED will glow a solid red.
Connect the battery to begin charging. Charging is
represented by a green flashing / blinking LED light. (See Charge Progress chart)
Disconnect the battery when charging is complete. When
the battery is fully charged the LED will glow a solid green.
See the Charger Progress and LED Indication charts below for more information.
Charge Progress
1 green flash
0-25% charged
2 green flashes
25-50% charged
3 green flashes
50-75% charged
4 green flashes
75-100% charged
Solid Green LED
100% charged
LED Indication
Meaning
Solid Red LED
Ready for Charging
Slowly Flashing Green LED
Charging (see Charge Progress chart)
Solid Green LED
Battery Fully Charged
Flashing Red LED
Charger Error (see Charger Error Codes below)
No LED
No power (check power source or DC plug fuse)
If there is an issue with the battery or charger the charger's LED will
flash or blink red. Refer to the Charger Error Codes chart below for more
information.
LED Indication
Meaning
Solution
1 red flash
Power Source Error
Check power source and DC plug fuse
2 red flashes
Battery error
Disconnect battery
3 red flashes
The charger safety timer has expired
Disconnect battery; if battery is too hot, discontinue charger use and contact Traxxas Customer Support
4 red flashes
The internal charger temperature is too high
Disconnect charger and allow charger to cool
7 red flashes
The battery voltage is too high
Disconnect battery; battery is not compatible with the charger
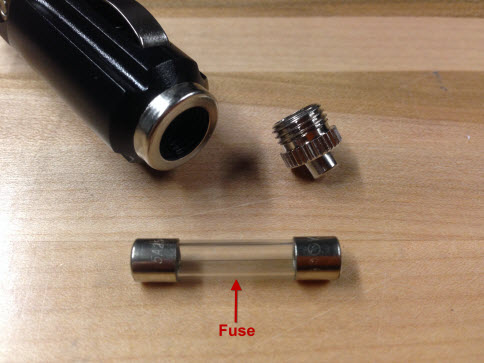
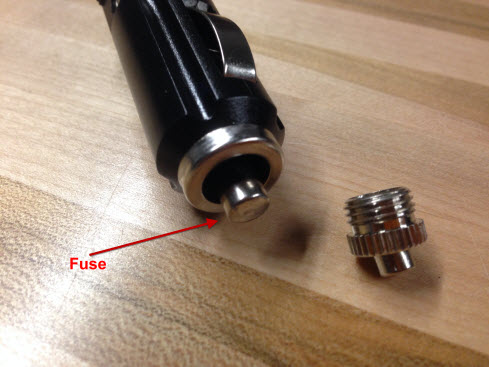
To determine if the fuse is responsible for an error code, use the following steps to check the fuse.
Unscrew the end of the DC plug.
Slide the fuse out. Note: Be careful to keep the cap end
of the charger together. Also, keep track of the spring that is on the other
end of the fuse inside the charger.
Insert new 5A Buss fuse. If the fuse is good, reinsert
the fuse. Note: Be sure to place the spring in the charger before inserting
the fuse.

 Canadian Dollar (CAD)
 Euro (EUR)