
 Canadian Dollar (CAD)
 Euro (EUR)
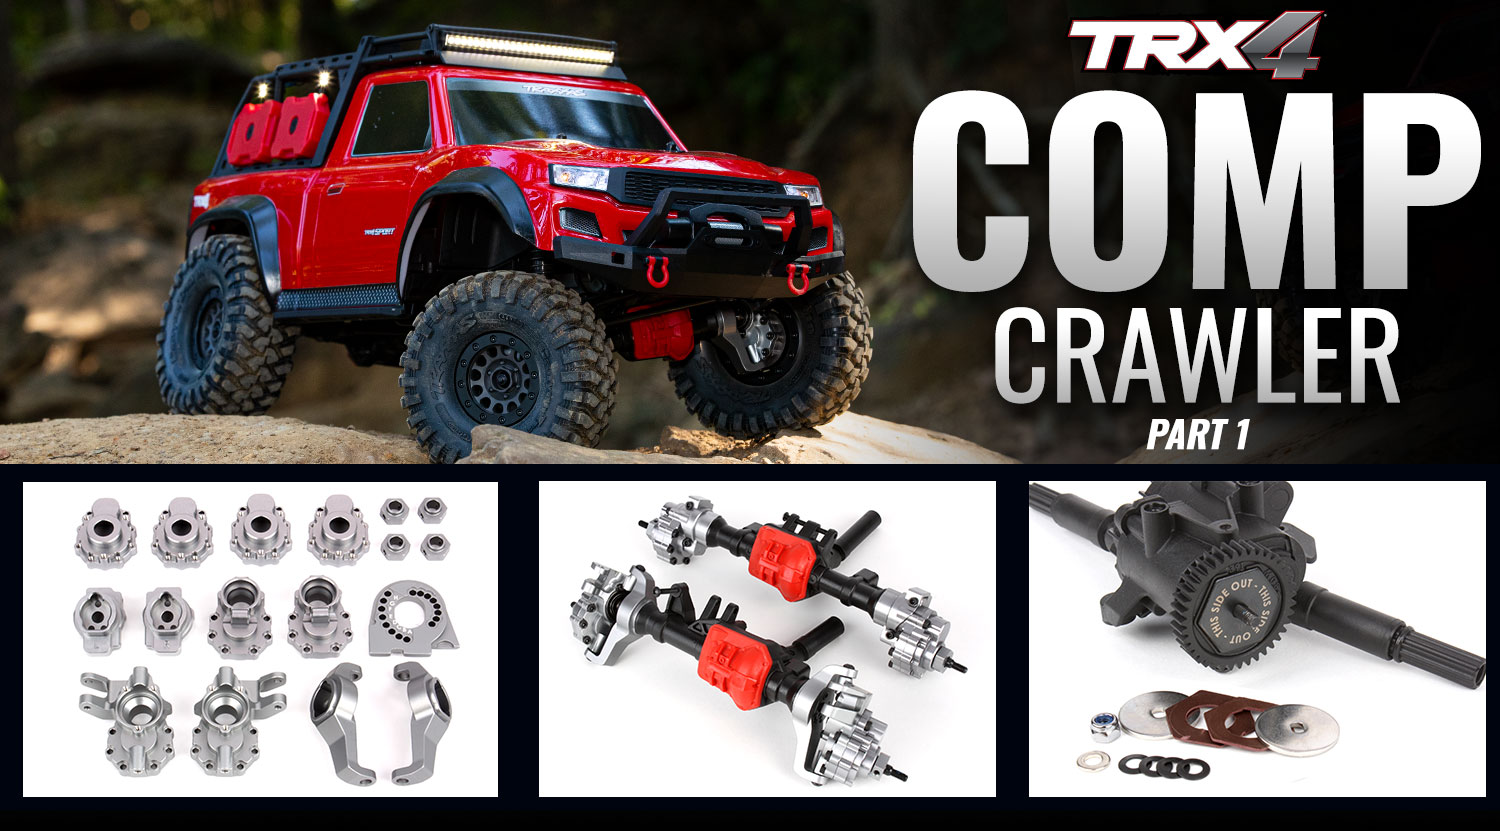
Part 1: Adding Aluminum Heavy-Duty Parts
| |
| Part 1 Build List |
| |
|
| |
| |
View the Full Line of TRX-4 Sport Accessories
Aluminum Upgrades
As with the previous TRX-4 project trucks, the Comp Rig is getting the full machined-aluminum and high-strength steel treatment. This time, we’re going with charcoal-gray anodizing on the aluminum parts for a more subtle look—but if subtle isn’t your thing, you can also get the parts in vivid red, blue or green. For installation tips, take a look at Part 2 of the “Ultimate TRX-4” build. Here’s the short version: remove the plastic parts, replace with aluminum. Everything fits like factory, because it’s by-Traxxas, for-Traxxas.

Aluminum Accessories

Chromoly Driveshafts
In addition to looking fantastic, the aluminum upgrade components are 2.5 ounces heavier than the plastic parts they replace. That’s more weight to help squish the tires against the terrain for better grip. While the axles are apart, we’ll also install the optional heavy-duty driveshafts. They’re machined from chromoly steel, so they’re definitely comp-tough.
Machined-Steel Ring and Pinion Gears
The previous TRX-4 projects got the optional machined-steel ring and pinion gears, but the factory gear ratios were unchanged. For the Comp Rig, we’ll install the 8287 overdrive gears in the front axle and the 8288 underdrive gears in the rear axle. In addition to the strength of machined steel, these gearsets deliver ratios of 2.75:1 and 3.5:1 respectively. This setup delivers the maximum amount of “front overdrive” to help the TRX-4 achieve peak climbing and crawling performance.

Machined Ring and Pinion Gears
Overdriving the front axle means the front wheels will spin faster than the rear. This helps pull the truck up a slope or obstacle while the rear is trying to push it up. In the same way that driving a front-wheel-drive car on a slippery road is easier to drive than rear-wheel drive, “pulling” the front of the truck via overdrive adds stability. Overdrive also helps the front tires to “bite” onto corners and seams of the rocks in the trail, to pull the truck through the terrain instead of pushing it through. The TRX-4 Sport does not have T-Lock differentials, so installing the overdrive and underdrive gears is extra easy. As with the previous TRX-4 builds, our comp rig is getting the aluminum motor plate 8290A. It’s stiffer than stock and helps dissipate heat.

Installing the Ring Gear

Completed Axles

Aluminum Motor Plate
Slipper Clutch Eliminator
All TRX-4 models have a slipper clutch to protect the drivetrain against overloads that might otherwise damage parts. Most drivers don’t even realize it’s there, but in competition conditions where zero drivetrain slip is required, eliminating the slipper clutch gives the TRX-4 an edge. The 8249 Slipper Eliminator simply replaces the factory slipper pads with steel plates that are keyed to the spur gear and transmission input shaft, which makes it impossible for the gear to slip on the shaft.
 Slipper Clutch Eliminator
 Eliminator Installed
We're not done yet. Check out Part 2 where we add some massive twist with a brushless servo, install some portal weights, and add a few suspension upgrades to build the ultimate competition crawler.
Get your wrench on, and show us how your TRX-4 turned out! Post your pics to Facebook, Instagram or Twitter with #MyTRX4Build, and we’ll be sure to share some of our favorites.