
 Canadian Dollar (CAD)
 Euro (EUR)
How to get the Most Performance from Your Traxxas Vehicle
Important Tuning Tips
If you’re tuning for track performance, make sure you’ve got appropriate tires on your car or truck. Suspension tuning is all about putting traction to work. If your model’s tires don’t provide sufficient grip to put your tuning changes to work, you’ll see very little effect from the adjustments you make.
Effective tuning is a lot like scientific experimentation, in that controlling the variables is key. Make one tuning adjustment, test it, assess the change in performance, then readjust and test again until you stop seeing a beneficial effect. Only then should you move on to the next adjustment. If you make multiple adjustments at once, you won’t be able to tell which are helping and which are hurting.
The differences in the settings of a poor-handling car or truck and one well optimized for best performance are measured in just a few degrees and millimeters, so your setting changes should always be incremental. A half-degree of camber, two millimeters of ride height, or a one-hole position change is plenty. If you adjust your car in big whacks, you may go from too little to too much and miss the optimum setting in between.
After making a change, put in ten laps or a few solid minutes of focused drive time before you decide whether or not you like the results. What may seem less than ideal two laps in may feel like a winning setup as you adjust to the change.
There is nothing slower than spinning out or crashing, so your primary goal should be finding a setup that makes your model easy to drive. Error-free laps, no matter how “slow” they may feel, will always be your fastest. When you’re able to consistently turn goof-free laps at maximum pace, then you can try settings that reduce traction to “loosen up” the car to shave your lap times down.
Adjusting Camber
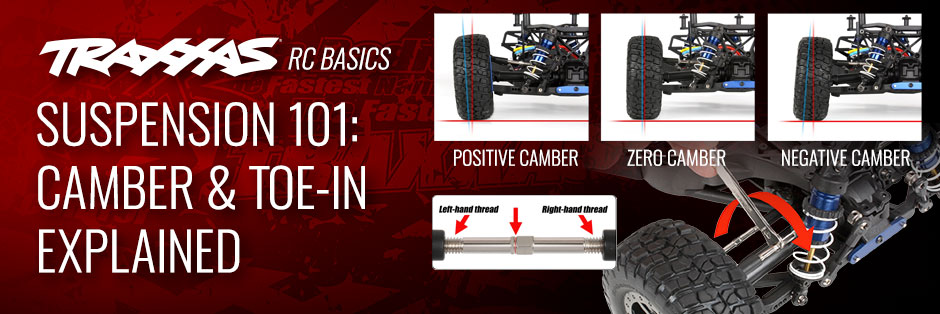
The term “camber” refers to the angle of the wheels relative to the driving surface, as viewed head-on and measured in degrees. If a wheel leans toward the chassis, it has negative camber. If a wheel leans away from the chassis, it has positive camber. And if the wheel is perfectly vertical, it has zero camber. Camber angle is dynamic, meaning it changes with suspension movement (more on that next). When measuring camber at the workbench, the precise term is “static camber”—static as in stationary. But you’ll generally see wheel angle referred to simply as “camber.”
 Most models are set with 1° or 2° of negative camber for all four wheels. Positive camber is virtually never used.
 Camber angle changes as the chassis leans over in the turns.
 Note how the tires’ contact patches shrink as the wheels lean over.
 Instead of developing positive camber in a turn, a tire with negative static camber will “stand up” and remain closer to zero camber.
How to Adjust Camber
Camber is adjusted by altering the length of the camber link (or for some models, the upper arm). The camber link is a turnbuckle, and depending on the direction you turn it, the turnbuckle will thread more deeply into the rod ends to shorten the camber link, or thread itself out of the rod ends to lengthen the link. A turnbuckle wrench is included with all turnbuckle-equipped models.
 The camber links are oriented so that turning the turnbuckles toward the front of the model will lengthen them (and vice versa).
The groove indicates the side of the turnbuckle with left-hand threads.
 You can measure camber with an angle-finding app (inclinometer) on your phone. Or, print out the camber gauge below.
 Print the gauge at 100%, glue it to stiff card or cardboard, and cut it out using a straight edge and hobby knife.
 Place the gauge against the wheel with the degree setting you’ve chosen pointing to the tire, then adjust the camber link until the gauge sits flush against the tire.
Camber Gain
To further enhance the suspension’s ability to maintain the outside tires’ contact patch, a well-designed suspension system will produce camber gain as the suspension is compressed. As the term implies, the wheels gain more camber angle as the suspension moves through its travel range.
 This suspension gains 8° of camber at full compression.
 The amount of camber change from full extension to full compression can be adjusted by choosing different mounting positions for the camber link. The factory setting of any Traxxas model are optimized for best all-around performance, but try experimenting with camber gain if you’re looking for an edge in highly competitive track driving. In general, reducing camber gain improves stability and traction on the straights, at the expense of cornering grip—and vice-versa, when you increase camber gain.
 On Traxxas 4X4 models, camber gain is adjusted by changing the camber link position on the shock tower. The links are in the innermost holes, and moving them to the outer holes will increase camber gain. Moving the links will also change your static camber settings significantly, so you’ll need to reset them.
Toe Angle
Toe angle refers to wheel position, but this time as viewed from above. If you set the wheels so they are perfectly parallel to the model’s centerline (in other words, pointing straight ahead), the wheels have “zero toe.” If the wheels angle toward center, they are set with toe-in, and if they point away from center, they are set with toe-out. Toe angle is measured in degrees. It’s common for front and rear wheels to be set with toe-in. Toe-out is not unheard of for the front wheels, but never used in the rear.
 Toe angle is measured relative to the chassis’ centerline.
How to Adjust Front Toe Angle
Front toe angle is set by altering the length of the steering tie rods. The tie rods are turnbuckle links on Traxxas models that feature adjustable toe angle (most do). Lengthen the tie rod to increase toe-in, shorten it to reduce it. Zero toe angle is ideal for steering responsiveness. A degree or two of toe-in will take some of the edge off of steering response and help calm a “loose” car, and make it easier to hold your line on the straights. Most drivers do not bother to actually measure toe, and instead set it by driving feel (racers may even tweak the setting more than once as track conditions change). Just be sure to adjust each steering turnbuckle in equal increments as you set toe angle.
 Front toe angle is set by adjusting the length of the steering link.
 How to Adjust Rear Toe Angle
The Revo 3.3, E-Revo VXL, Summit, and Slayer Pro 4X4 allow rear toe angle to be adjusted via a turnbuckle link, as described for the front wheels. The rear toe angle of other Traxxas models is fixed, but some models allow toe angle to be changed by installing optional rear stub-axle carriers. The Nitro Slash, Nitro Rustler, and the 4X4 versions of the Rustler, Stampede, Slash, Hoss, and Ford Fiesta Rally models can be outfitted with aluminum stub-axle carriers that will add or subtract 1.5° of toe-in, depending on how you install them.
 Installing the 1952X aluminum hub carriers with the “L” carrier on the left suspension arm and the “R” carrier on the right will add 1.5° of toe-in. Flipping the carriers (mount “R” on the left, and vice-versa) will subtract 1.5°.
Rear toe-in improves straight-line stability, and virtually every vehicle with independent suspension will have some rear toe-in, whether RC or full-size. Reducing rear toe-in can help a car feel more “loose” on high-grip surfaces and carry more speed in the turns. Increasing rear toe-in can improve forward traction but may reduce steering responsiveness. Rear toe-in settings greater than 5° per wheel bring rapidly diminishing returns as the extreme toe angle causes tire scrubbing that robs efficiency and traction.
 The Revo 3.3, E-Revo VXL, Summit, and Slayer Pro 4X4 all set rear toe via turnbuckle links, allowing very fine adjustments without disassembly.
 The Jato 3.3’s rear toe angle can be set to 3°, 4°, 5° by altering the angle of the rear suspension arms via optional hingepin tie bars.
That marks the end of the first installment. Click on the links below to see other installments of our Suspension Tuning Guide series
- Click here to see part 2: Shock Absorbers
- Click here to see part 3: Shock Position and Roll Center
- Click here to see part 4: Sway Bars and Tuning Tips